Friday, December 24, 2010

SOME FRIENDLY HOLIDAY ADVICE

DON'T feed Miracle-Gro to a poinsettia. You will be disappointed.


I thought I was doing this plant a favor! It (and I) nearly died within a couple of hours...then a few days later this happened.


I think his face pretty much says it all. But the new little leaves at the top give me hope. Will it come back to life?

Wednesday, December 22, 2010

FANCY GANTZ RANCH

YAY! The most fun project I've worked on in a long time!


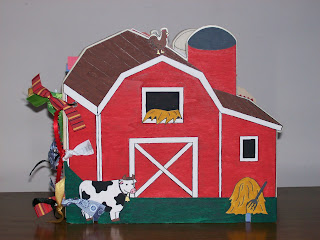
The idea was "hatched" when your chickens started laying eggs! What started as a little egg recipe book morphed into a full-fledged tribute album to your little farm =*)
Hope you don't mind me calling it "Fancy Gantz Ranch." Seemed like an eggs-cellent choice to me.


Heaven on Earth for chickens.


Recipes in the recipe section have all been tasted and approved by the fam!


Jokes have been laugh tested by the kids...projects have not been tried, so good luck with those!


The cute papers, ribbons, buttons and chipboard stickers are from a barnyard set I found at Michael's. (Have you noticed the lack of chicken and egg embellishments out there?)


The covers were wood plaques that came with pitiful little markers for coloring, from the clearance bin at Michael's. 49 cents each! I used paints instead of the markers. Had to draw my own back cover since the backs were blank and the odd shape wasn't conducive to turning the back cover around.


Hope you have as much fun looking through it as I did making it!

FAMILY TREE

This is what Mom and Dad are getting for Christmas!


It is made totally from scraps on muslin.


I used fusible web to hold the leaves in place, then stitched around each leaf, either by hand or by machine, in a variety of stitches. Everyone's name is hand stitched, then I went around everything with the machine and freestyled some flowers, clouds, etc., around the perimeter, adding a few hand-stitched details here and there.
Mom and Dad are on the trunk, then each of their three children have a main branch with their spouses, and grandkids are on smaller branches from there.


My favorite thing about it is that I found the vintage frame AFTER I started stitching, and it was a perfect size! Like the Lord had it all planned out and knew exactly what size muslin scrap I'd be using. He must like Christmas =*)


I bet something similar (and less time-consuming) could be done with pretty papers.
Here's the back...it's from Psalm 128.


"Blessed is every one that feareth the Lord...
Thy wife shall be as a fruitful vine by the sides of thine house;
thy children like olive plants round about thy table.
The Lord shall bless thee...thou shalt see thy children's children."

Tuesday, December 21, 2010

HOMEMADE HARD CANDY

Our first attempt at ho-made candy was (mostly) a success! Made the lemon batch first, but didn't have enough corn syrup and didn't boil long enough, so it didn't set up. We weren't sure it would work to put it back on the stove, with the food coloring and flavor already added (as they are supposed to go in after taking the pot off the heat) but it did work! These hard candies are HARD! The pink ones are raspberry flavored.


Here's the recipe- it's super easy, but you have to boil it for a long time.

1 cup white sugar
3/8 - 1/2 cup Karo (corn) syrup
1/2 cup water
1/4-1/2 tsp flavored extract
1-2 drops food coloring
1-2 Tbsp powdered sugar

Put the sugar, corn syrup and water in a pot over medium heat, stir until sugar is dissolved, then let it sit and boil. And boil. It needs to get to 300 degrees F. It will start to look thick, and if you drop a bit into a glass of water, it should form hard brittle threads. If you drop some in water and you can't decide if it's hard brittle threads, then it isn't. Keep boiling.

When it's 300 degrees, turn off the heat and add the flavoring and food coloring. Stir quickly but thoroughly.

When you pour the candy out (we greased waxed paper and laid it right on the counter) it will look very bubbly. The bubbles seem to disappear as it sets up, but you want to see thousands of tiny bubbles when you pour it out. In about a minute or two, run a pizza cutter through it to cut into squares, diamonds, triangles...the shape is up to you.

If it's not setting up, by all means pour it back in the pot and try again! The waxed paper made this easy. We just folded the paper into a cone and let it run back into the pot. Then I ran two fingers down the length of the paper to squeeze out as much as I could. Toss that paper and grease a new sheet while it reboils.

Let it cool. It will be hard! Pull up on the waxed paper and rows of it will start to pop off. Break along the scored lines, drop into a baggie with 1-2 Tbsp of powdered sugar and shake to coat. (This is a good step for an excited little helper to do...or your husband!)

One batch makes enough to fill a 10 or 11 oz. jar. I heart fancy jam that comes in these cute, reusable square jars!

Saturday, December 18, 2010

NEW & IMPROVED POT HOLDERS


I went back to these and decided more quilting was in order. The more quilting there is, the better they look! My sister-in-love's set are very similar to my mother-in-love's set, but with linen backs instead of stripes to match her towels (didn't have enough fabric). The center of each potholder is machine quilted, freestyle! There's a leaf, a flower, a rainbow and a cross. I'm finally happy with them. They are packed and on their way Down Under.

GIFT CARD HOLDERS


So...the sweetest boy in the whole world wanted to buy his dad an iTunes card for Christmas. But all they had at the store were multipacks of 3 $10 cards. $30 was not in his price range, but I loaned him the cash and told him he could give one to Dad & we could list the other two cards on ebay. Since they have no packaging (we busted them out of the multipack) we decided to craft these little card stock envelopes to make them more appealing and hopefully get our sweet moolah back on the auctions!

BIBLE STUDY (SURVIVAL?) KIT


This little kit has everything you'd need to take to Ladies' Bible Study! Gum, tissues, highlighter, pen, 3x5 cards for writing prayer requests and memory verses on...and a homespun, hand embroidered bookmark to match.

Wednesday, December 15, 2010

POT HOLDERS FOR KITCHEN SETS


I finally finished these last night in front of the TV. I love the orange trim! I kept coming back to it, even though I was hesitant because I haven't known Mom to ever use orange in her decorating. But it's such a kitchen-y color! Like fresh squeezed orange juice =*)
It was fun to do a bit of hand quilting. One of the best things about hand stitching is the time spent thinking about and praying for the recipient. Especially when the recipient is Mom, because she's so appreciative of the effort.


This is one of the set I made to go with the kitchen towels for my "mother-in-love" (one of our favorite mistranslations from Spanish into English!) Hers are in the process of being machine quilted, but still got to spend quiet time in prayer for her as the binding was hand-stitched around the back at two o'clock this morning.


I love how these turned out. The red and white looks so fresh. And there was enough fabric left over to make another little gift- not sure who it will be for! Will post about it later...

Fabric-covered Valet


Getting ready to wrap everything up that's going to Australia, we realized we hadn't made anything for Tata! So I remembered a little fabric coaster tray tutorial I put on the to-make list a while back, and thought it might be just the right thing. Tata lays his phone, keys, etc., on a shelf on a hutch inside their front door. This little tray is about 6.5" x 10.5" x 1", a nice size for corralling all his little things and a great way to protect the wood of their nice china hutch. The buttons on the corners can be unlooped so the whole thing lays flat for travel.
The original coaster tray was smaller--obviously, it was the size of a coaster!--and the corners were pinched and stitched. Also, it was interfaced fabric. This one has the corners cut out (looks like a giant cross with stubby arms) and thin cardboard lining in each section. A stitched seam holds each piece in place. The loops are elastic hair bands cut in half, the buttons and linen are from the $1 Salvation Army dress, the green fabric is left over from Easter tree costumes, and the cardboard is from a cereal box. Total cost= $0!

Thursday, December 9, 2010

BLAST FROM THE PAST


This was hiding in a box in the attic! I remember seeing these cute little Santas and friends with pinpoint eyes in a crafty magazine while babysitting waaaay back in 1991. The lady I was babysitting for had the cutest little house- it looked like The Country Shop. Remember that place? Anyway, later on at home, I painted my version of Cute Santa and his pal Merry Moose on this wooden plaque. What a neat find =)

GIFTS EVEN A MAN CAN MAKE

Talking about handmade Christmas gift ideas last night with friends, one of the guys really wanted to make something for his wife, but was feeling intimidated by sewing, crafty kinds of things. Maybe other men out there are struggling with coming up with ideas, too, so here are a few ideas from Punk, the craftiest man in our house (until the kids reach manhood, anyway).


Put together a vehicle emergency kit. Include a flashlight, disposable camera, flares, notebook and pen, and a checklist of what to do in case of an accident. Also include a mini first aid kit- bandaids, gauze, Neosporin, alcohol wipes, and pain reliever. Punk gave these to everyone with a car one year, and put everything into a zippered pouch like banks used to use.

Learn to cook. One year he bought a pasta cookbook and ingredients to make dinner. I was shocked, because he never cooked! He did a great job, and liked doing it so much he did a bunch of other recipes from the book, too. We had a lot of fun cooking together. Still do!


One gift he gave me was a small notebook, after noticing that I was writing notes and lists on scraps of paper and losing them. It was a great gift, and even though it’s filled up now, I still keep it because it’s full of memories of that year. You can buy one, or make one by cutting paper to the size you like and punching holes along one edge- run string or ribbon back and forth through the holes. We use cereal boxes for covers, either covered in fabric or paper, or left as cereal ads. (You can get plain thin cardboard when you buy a new shirt.) The kids love the 3 Rice Krispies guys for theirs. A nice thing to do is to print or write scripture verses, jokes, love notes or whatever on some of the pages. We’ve even printed out coloring pages, tic tac toe boards and mad libs for the boys. Does the recipient like Sudoku or Crosswords? You can find them online for free. I’m in the process of making a book for a friend that is a prayer journal. About half the pages have Bible verses on prayer, comfort, peace, etc. Others are left blank with space for her to write her own thoughts and prayers.

If you have an iMac, make a calendar or photo album. They’re easy, inexpensive and they look really professional. There’s a fun little mini album about the size of a credit card. In iPhoto, click on Book at the bottom to link to the website to see all the options. If you do this one, you’ll need to hurry to get it shipped to you in time for Christmas.

Think about what your special people like: food, animals, sports, fitness, traveling, board games, movies...or what they need, like that notebook! If you're paying attention, the right gift idea will come to mind in no time. Making it personal is what makes it special!

Get crafting, guys!

Wednesday, December 8, 2010

THE PRINCESS IS THE FROG


This dress is for my little niece in Australia. She (and especially her "mum") look so much like Josefina, so we sent her the doll for her birthday a few months ago. She loves her new doll! She's been asking for some clothes for her, so I'm going to try to send a few dresses for Christmas. It's summer there- feels weird to do a summery little dress in December! This is the first one, crafted from a 99 cent yard of fabric from the hole.


I got a yard of blue material just like it, but probably will use the blue for something else...it feels like nice pillowcase material. They had a yard of yellow, too, and I'm kicking myself for not picking it up. For a buck? Are you kidding me? Sometimes I'm too tight for my own good.


I'm pretty happy with the way this turned out. Being sleeveless with a lined bodice, I was able to hide all the seams inside. No raw edges anywhere!


I have this ribbon- over 3 yards of it- and am trying to decide if they go together. Would it make a cute trim on an apron?

Tuesday, December 7, 2010

CD Photo Ornaments


Made a couple of prototypes for the MOPS craft for our upcoming Christmas party. Everyone will hopefully be bringing photos of each of their kids to make into ornaments, but I'm thinking I'd better have a few holiday images or words for those who forget. We don't want anyone to be left out! These were so easy to make, the crop-a-dile really was a piece of cake for punching the holes, and now we finally have a picture of Diddle on our tree!

Sunday, December 5, 2010

Wool hat and mittens


This "felted" (aka, shrunken!) sweater has been taking up space in the hope chest for so long. I cut the hood off and made it into a hat. It's a cute cloche style and the flower turned out great, but unfortunately the hat looks better on the table than it does on the head...needs more shaping.


The arms might have turned out better as fingerless gloves, but the right way to do it wasn't coming to mind. They were so wide! So I decided to try mittens. The first pair I made turned out all wrong. FYI- zigzag stitch is not the way to sew felt! The seams were wavy. The tiniest straight stitch proved a much better option.


What's great about them is the flannel lining. They are so warm! Mittens are warmer than gloves anyway, but these are very toasty. Who doesn't need an extra pair of warm mittens for making snowballs?

Friday, December 3, 2010

Easy Dipped Pretzels & Animal Crackers


The kids did a great job dipping and sprinkling these fun Christmas treats yesterday. The boxes were folded from 8.5" squares of card stock (blue) and glossy white heavy paper that Punk brought home from the office recycling bin. The boys prefer the curling ribbon trim on the white box. The wired cream colored ribbon is too fancy for them, I guess, but I think it's pretty!

Thursday, December 2, 2010

More Kitchen Ensembles


Everyone and her sister is getting a kitchen set for Christmas this year!